 |
| Katie's DIY wall art |
Materials & Tutorial
Shopping List:
- 9 – 12 in. x 12 in. scrapbook paper sheets/pages (most are less than $1.00 each @ Michaels)
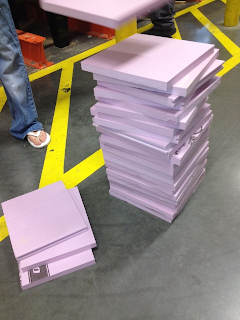
- 9 – 1 in. x 12 in. x 12 in. Styrofoam boards (Michaels sells ½ in. boards for $3.99 each, but I went to Home Depot and bought a 1 in. x 48 in. x 8 ft. sheet of Styrofoam for $13.25 and had them cut it into the pieces I needed. Plus, I have plenty of extra for other crafts!)
- Elmer’s glue
- Sponge paint roller to spread the glue on the boards (the glue washes out so you can reuse the roller for other projects)
- Choose your border: 36 ft. of ribbon the width of your foam board and Elmer’s glue or a hot glue gun - OR - acrylic paint, sponge roller (you can reuse the one for gluing)
- 3M Command Damage-Free Hanging Medium Refill Strips 9-ct. ($3.99 @ Michaels *eligible for coupons* or $3.14 @ Target)
 |
| (Scrapbook paper spread out on Michaels floor) |
 |
| (Cutting my square panels at Home Depot) |
**Note: When I made my wall art, I put the scrapbook paper on the board before the ribbon. Looking back, it would have been much easier to paint the borders (instead of ribbon) and then glue on the paper. The tutorial will walk you through the EASIER way!**
Tutorial:
- Depending on what you chose for your border, either paint the edges of each Styrofoam board or glue ribbon onto the edges. Let them dry all the way before moving on to the next step. If you are reusing your sponge paint roller for the glue, rinse and dry it out thoroughly.
- Use the sponge paint roller to cover the surface of the board with Elmer’s glue. Quickly (but carefully!) lay the scrapbook paper on the surface. To avoid air bubbles, start by lining up one edge and work your way to the other. Repeat this for each of the nine boards, letting the glue dry before hanging.
- Hang the nine panels on the wall using the 3M Command Strips. I love using these because they make the panels look flat against the wall and don’t leave marks if you eventually want to move your wall art. I spaced my panels 1 ½ in. apart on my living room wall.
 |
| My completed DIY wall art hanging above the couch |
My friend Courtney liked my wall art, so she made one that matched her place. Since I had plenty of extra Styrofoam boards, she used mine to make her own gorgeous version.
 |
| Courtney used nine different patterns in matching cool colors |
If you have any questions or want to share your ideas, please send us an email at ThursdayNightThreads@gmail.com


Wow, these wall art are really looking very attractive on the wall and they are increasing attraction of the wall, many thanks for sharing.
ReplyDeletehttp://beknown.com/flveiscnikoinsk