Tuesday, November 27, 2012

Like Kids in a Candy Store! Cinnamon Hard Candies

It's that time of year...holiday baking has begun!  This year, we decided to branch out a little and try some hard candies along with Christmas cookies!  Neither of us have had experience making candies and we had heard that it can be a bit tricky!  It went surprisingly well for us!  In about 30 minutes we had a pound of tasty and addicting cinnamon hard candies!  We'll walk you through it, but we found the original recipe on Taste of Homes here.

Supplies

Ingredients

* 2 cups of sugar
* 1 cup of water
* 1/2 cup of light corn syrup
* 1/4 to 1/2 teaspoon of cinnamon oil 
* 1/2 teaspoon of red food coloring   

Note: We found cinnamon oil at Kitchen Window (a specialty kitchen shop) for $1.99 a bottle

Instructions


1. In a large saucepan, combine sugar, water and corn syrup.


 2. Bring to a boil over medium heat and then cover and cook for 3 minutes.

 3. Uncover and put your candy thermometer in the mixture and wait for the temperature to reach 310°F (hard-crack stage).
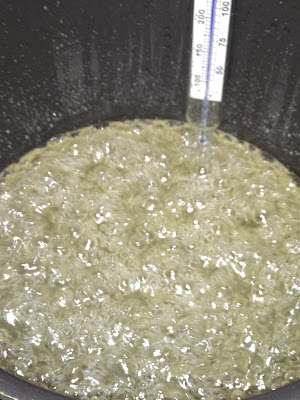
As it gets to 310 degrees, the mixture thickens

 4. Once the mixture reaches 310°F, quickly remove from heat, mix in food coloring and cinnamon oil and pour into a greased 9 x 13 baking pan.

5.  Score the candy into 1 inch squares and then cut through each square.

Scoring/cutting the candy
  
That's it!  Enjoy your hard candies and try out some different flavored oils!  We are going to try peppermint and butterscotch next!


Finished Candies


Saturday, November 24, 2012

DIY Wall Art Panels – Scrapbook Paper and Styrofoam Board

Ever since I joined Pinterest, I’ve seen different ideas for using scrapbook paper and foam board to make beautiful, decorative DIY wall art. I’m not allowed to paint my walls, so big wall art goes a long way to brighten up a dull space. This craft project is a fun way to express yourself and “wow” your friends and family. Here is the wall art I made for my living room!


Katie's DIY wall art

Materials & Tutorial


Shopping List:

  • 9 – 12 in. x 12 in. scrapbook paper sheets/pages (most are less than $1.00 each @ Michaels)
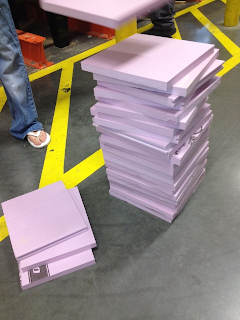
  • 9 – 1 in. x 12 in. x 12 in. Styrofoam boards (Michaels sells ½ in. boards for $3.99 each, but I went to Home Depot and bought a 1 in. x 48 in. x 8 ft. sheet of Styrofoam for $13.25 and had them cut it into the pieces I needed. Plus, I have plenty of extra for other crafts!)
  • Elmer’s glue
  • Sponge paint roller to spread the glue on the boards (the glue washes out so you can reuse the roller for other projects)
  • Choose your border: 36 ft. of ribbon the width of your foam board and Elmer’s glue or a hot glue gun - OR - acrylic paint, sponge roller (you can reuse the one for gluing)
  • 3M Command Damage-Free Hanging Medium Refill Strips 9-ct. ($3.99 @ Michaels *eligible for coupons* or $3.14 @ Target)

(Scrapbook paper spread out on Michaels floor)
(Cutting my square panels at Home Depot)

**Note: When I made my wall art, I put the scrapbook paper on the board before the ribbon. Looking back, it would have been much easier to paint the borders (instead of ribbon) and then glue on the paper. The tutorial will walk you through the EASIER way!**

Tutorial:

  1. Depending on what you chose for your border, either paint the edges of each Styrofoam board or glue ribbon onto the edges. Let them dry all the way before moving on to the next step. If you are reusing your sponge paint roller for the glue, rinse and dry it out thoroughly.
  2. Use the sponge paint roller to cover the surface of the board with Elmer’s glue. Quickly (but carefully!) lay the scrapbook paper on the surface. To avoid air bubbles, start by lining up one edge and work your way to the other. Repeat this for each of the nine boards, letting the glue dry before hanging.
  3. Hang the nine panels on the wall using the 3M Command Strips. I love using these because they make the panels look flat against the wall and don’t leave marks if you eventually want to move your wall art. I spaced my panels 1 ½ in. apart on my living room wall.


My completed DIY wall art hanging above the couch

My friend Courtney liked my wall art, so she made one that matched her place. Since I had plenty of extra Styrofoam boards, she used mine to make her own gorgeous version.

Courtney used nine different patterns in matching cool colors

If you have any questions or want to share your ideas, please send us an email at ThursdayNightThreads@gmail.com


Friday, November 16, 2012

A New Frosty is Coming to Town!

The cool weather is quickly approaching in Minnesota, so we were looking for some new craft ideas for winter!  After browsing around and finding many different snowmen made out of KraftyBloks, we decided to give it a try and make our own version!  

Our completed snowmen :)
This project was simple and fun.  You gotta love when you can gather all the materials start and complete a project in one evening!  Below we'll give you the step by step tutorial on how to make these cute little snowmen!

Materials & Tutorial

Most of the materials needed for this project are probably things you have laying around, which makes it cheap!  

Shopping List:
  • 1 KraftyBlok-Original Size ($11.99 @ Michaels)
  • 1 KraftyBlok-Mini Size ($9.99 @ Michaels)
  • Acrylic Paint (Black, Orange and White)
  • Small circle "sponge dobber" paint brush to make the buttons, eyes and mouth
  • Large circle "sponge dobber" paint brush to paint on the white
  • Regular Paint brush to paint on nose
  • 1 string of 100 ct. Christmas lights (Buy them on clearance after Christmas!  Always good to have these around)
  • 1/3 Yard of Flannel fabric
  • Glue Gun
**Note: We had no clue what KraftyBloks were before we started, and it seems, either do some of the employees at Michaels...so don't give up if they look at you funny when you ask for these! :) Don't forget your 50% off coupons for these!  We were not able to find the KraftyBloks @ Joann**


Tutorial: 

1. Put 3/4 of your string of lights in the larger block and about 1/4 of the string in the smaller block.  Don't forget to leave enough of the string outside of the block so that you will be able to plug it in.  We plugged ours in and made sure the squares were evenly lit.
Blocks with Xmas lights
2.  Use the large sponge paint brush to paint both of the blocks white.  In order to get the look we have, we "dobbed" the paint using a sponge paint technique.

Painted blocks with lights


3. Use hot glue gun to glue the two blocks together, ensuring that the plug in from the lights is situated the way you want it to be coming out of the block.

4. Use the smaller sponge paint brush to paint on the eyes, mouth and buttons and use a regular paint brush to paint the nose.  Get creative and do this however you'd like!  


Frosty's face and buttons completed


5. Sew a small hat for the snowman.  There is really no right or wrong way to do this!  We used this pattern and made it snowman sized and cut fringes on the top.  

Ta-da!  Completed product


We hope you like this idea and you'll make one of your own!  We'd love to see your pictures if you do!  Email them to us at ThursdayNightThreads@gmail.com

Happy Winter (almost!)

Thursday, November 8, 2012

Thursday Night Threads - How It All Started

Why Thursday nights? 

And who are these courageous crafters?

It all started in the winter of 2011. A Minnesota winter means blizzards, ice and below-freezing temps. Fresh out of college, we found ourselves facing our first winter in 17 years without school, homework or studying. But there never seems to be enough time between friends, boyfriends, work, mentoring, family, etc. So even though we are busy, we made an unspoken pact that Thursdays nights are our nights. Every Thursday, we meet up after work to craft, cook, relax and most importantly, just be friends. Our Thursday nights have become a sacred night that NO ONE dares disturb.

We are truly modern-day crafters. We both had limited crafting backgrounds, but through Pinterest, YouTube and craft blogs, we began to learn more and more. We could only handle pinning away our hopes and dreams for so long before we needed to start trying our new ideas. We made our first trip to Michaels and dove in head first to our crafting projects. Since then, we've been unstoppable. We bought glue guns, Mod Podge, cutters, sewing machines and more. Many mistakes were made. Many purchases returned. Many unplanned trips to the fabric store. But we don’t regret a single craft project.

Thursday Night Threads is our chance to give you some ideas, tips and lessons learned from our craft and sewing projects. Enjoy!

A First Quilt to Restart a Crafter at Heart

I have always been a crafter, but not so much a sewer.  About two months ago the last time I had even touched a sewing machine was in 7th grade sewing class (and I have been out of college for almost two years)!  One day in September, as Katie and I were looking at projects on Pinterest, we realized our crafting projects were limited without a sewing machine.
 

After seeing all of the possibilities of crafts we could do, we suddenly got the bug to buy sewing machines.  After hours of research and reading many reviews, we landed on the Brother CS6000i.  Yes, you read this right…Katie and I have matching sewing machines!

As soon as I got my machine, I decided to dive right in and start a quilt as my first major project…crazy idea, right?!  Yeah, I didn’t really know exactly what I would be getting myself into.  But thanks to Pinterest, I see all these pictures and I tend to feel that I can accomplish any project.  So I decided to skip right over the pillows and hot pads and make my very first quilt.  Who needs a warm up project?  Not this gal!  YouTube and Google were my best friends in order to search for techniques, tips and videos. 

My First Quilt! :)

I came across the Family Ever After blog  and found this adorable ruffle-top quilt.  I noticed it was a quilt along, and even though it started in May, and I was starting in September, I decided to give it a shot.  I figured if worse came to worse, I could always ask Rach who writes the blog.  Somehow that was enough security for me to be crazily over-ambitious. 

Let’s just say the ruffle foot was not my friend through the process of making this quilt (and I have some valuable lessons learned on this that I will pass on to you another day). 

Anyway…the big reveal!!!  Here is my very first completed quilt.   :)
 

Advice for you beginners out there:

As I completed the last stitches of this quilt, I felt a feeling of accomplishment that I have never felt before.  My advice to you is this: even if you are just a beginning sewer don’t be scared to jump right in to a project that you think may be a bit over your head.  You will come out of it having overcome challenges, having learned lessons for future projects… and most importantly, having an amazing project that you can be proud of and treasure forever!